Introduction:
Thinking of taking the plunge into the world of scalp micropigmentation? Fantastic choice! It’s a decision that can transform your look and boost your confidence. To ensure you have a smooth and successful scalp micropigmentation journey, we’ve put together a lighthearted checklist that covers everything you need to know before, during, and after the procedure. So, let’s dive in and get your scalp ready for its micropigmentation makeover!
Pre-Procedure Preparations:
1. Do Your Research:
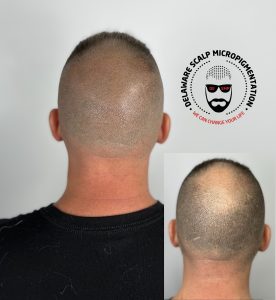
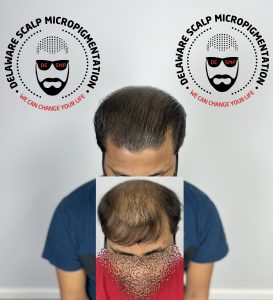
Take the time to research and find a reputable scalp micropigmentation artist or clinic. Scalp micropigmentation (SMP) is a specialized procedure that requires skill and expertise. Read reviews, check before and after photos, and ask for recommendations. Look for artists or clinics with a proven track record of delivering excellent results. Remember, your scalp deserves the best!
2. Consultation Time:
Schedule a consultation with your chosen artist or clinic. This is your chance to discuss your expectations, ask questions, and ensure you’re on the same wavelength. During the consultation, the artist will evaluate your scalp condition, hair loss pattern, and desired outcome. They will explain the procedure in detail and provide personalized recommendations. It’s like dating but with ink!
3. Plan Your Hairstyle:
Consider the hairstyle you want after the procedure. SMP can recreate the look of a closely shaved head, add density to thinning hair, or create a defined hairline. Bring some inspiration photos to discuss with your artist. Together, you can collaborate on designing the perfect look for your scalp. Get ready to become the Picasso of your own scalp!
4. Avoid Sunburn and Tanning:
Sunburned scalp? No, thank you! Protect your head from the sun’s wrath and avoid tanning beds or excessive sun exposure before your procedure. Sunburn or tanned skin can affect the color matching process and may interfere with the healing of the pigmented areas. You want a blank canvas, not a crispy one!
5. Trim, Trim, Trim:
Give your existing hair a short trim before the procedure. This helps the artist better match the pigmentation with your hair color and style. Trimming the hair also ensures that the pigment will blend seamlessly with your natural hair follicles, creating a more natural-looking result. Plus, it’s like giving your hair a spa day before its big transformation!
During the Procedure:
1. Comfort is Key:
On the day of the procedure, dress comfortably and wear clothing that allows easy access to your scalp. The procedure can take several hours, so make sure you’re relaxed and at ease. Consider bringing a pillow or neck pillow to enhance your comfort during the process. Relaxation is the name of the game!
2. Numbing Cream:
To minimize any discomfort, the artist will apply a topical numbing cream to your scalp. This cream helps to numb the area and make the procedure more comfortable. You may experience a slight tingling sensation as the cream takes effect. Sit back, relax, and let the cream work its magic!
3. Hairline Design:
The artist will work closely with you to design your desired hairline. They will consider factors such as your facial features, hair loss pattern, and personal preferences. This is your chance to contribute your input and collaborate with the artist to create a hairline that suits you perfectly. Together, you’ll create a vision that will be transformed into a reality on your scalp.
4. Pigment Application:
Using a specialized microneedle or a digital SMP machine, the artist will carefully and meticulously apply the pigments to your scalp. The process involves creating tiny, precise dots that resemble hair follicles. You may feel slight pressure or a tingling sensation during the application, but rest assured that discomfort is kept to a minimum. Take this time to relax and enjoy the artistic process unfolding on your scalp.

5. Building Layers and Density:
Throughout the procedure, the artist will layer the pigments to create depth and density. This technique helps to achieve a natural and realistic look. The artist will pay attention to the angle and direction of the hair follicles, carefully replicating the natural pattern of hair growth. This meticulous approach ensures that the final result blends seamlessly with your existing hair, giving the appearance of a fuller head of hair. Trust the artist’s expertise and expertise as they build layer upon layer to create your desired look.
6. Open Communication:
Feel free to communicate with your artist during the procedure. If you have any concerns or questions, don’t hesitate to speak up. Good communication ensures that you’re both on the same page and helps achieve the best possible outcome. The artist will guide you through the process, providing updates and ensuring your comfort. Your input is valuable, so don’t be shy to share your thoughts and preferences as the procedure progresses.
By understanding what to expect during the procedure, you can approach your scalp micropigmentation experience with confidence. Remember, this is an opportunity to embrace a new look and enhance your self-confidence. Trust in the expertise of the artist, communicate openly, and get ready to unveil your transformed scalp to the world!
Post-Procedure Pampering:
1. Gentle Cleaning is Key:
After your scalp micropigmentation procedure, follow the cleaning instructions provided by your artist. It’s essential to keep your scalp clean to prevent infection and ensure proper healing. Gently cleanse your scalp with a mild, non-abrasive cleanser and lukewarm water. Avoid rubbing or scrubbing the treated areas. Instead, pat them dry with a clean towel. Remember, you’re not polishing a car!
2. No Touchy-Touchy:
Resist the urge to touch or scratch your freshly pigmented scalp. It’s normal to feel some itchiness as the scalp heals, but scratching can disrupt the healing process and affect the pigmentation. Keep those hands off and distract yourself with a captivating book, a Netflix binge, or a hobby. Before you know it, the healing process will be complete!
3. Shield from the Sun:
Your newly pigmented scalp deserves some extra TLC in the sun. Protect it from harmful UV rays by wearing a hat or applying sunscreen with a high SPF. Even if you’re not directly exposed to sunlight, remember that UV rays can penetrate through windows. So, whenever you’re outside, show off your stylish headwear collection and keep that scalp safe!
4. Moisturize, Moisturize, Moisturize:
Keep your scalp well-moisturized to prevent dryness and flakiness. Opt for a fragrance-free moisturizer or one recommended by your artist. Apply a small amount of moisturizer to your scalp daily, gently massaging it in. This will help keep the skin hydrated and promote optimal healing. Your scalp will thank you for the hydration boost!

5. Follow-Up Care:
Make sure to attend any follow-up appointments recommended by your artist. Typically, there will be several sessions to complete the SMP process, and each session builds upon the previous one. During follow-up appointments, your artist will check the healing progress, address any concerns, and make any necessary adjustments. Think of it as a VIP treatment for your head! Following up with your artist ensures that you achieve the best possible results.
Delaware SMP: A Special Mention
Delaware, the “First State” of the United States, is a hidden gem when it comes to scalp micropigmentation. While it may be small in size, Delaware boasts talented scalp micropigmentation artists who can work their magic on your scalp. If you’re a resident of Delaware or happen to be passing through, consider exploring the SMP options available in the state.
Delaware SMP clinics offer professional services, utilizing the latest techniques and equipment to provide you with outstanding results. Whether you’re seeking to enhance your hairline, camouflage scars, or add density to thinning hair, the skilled artists in Delaware can cater to your needs.
Before booking an appointment in Delaware, remember to research the available SMP clinics and artists thoroughly. Look for testimonials, reviews, and before and after photos to ensure they meet your expectations. Additionally, scheduling a consultation will allow you to discuss your goals, ask questions, and gauge the artist’s expertise.
Conclusion:
Congratulations! You’ve made it through the Scalp Micropigmentation Checklist like a champ. By following these lighthearted guidelines, you’ve set yourself up for a successful scalp micropigmentation experience. Remember, it’s all about taking care of your scalp, embracing your new look, and strutting your stuff with newfound confidence.
Scalp micropigmentation is a remarkable procedure that can transform your appearance and boost your self-esteem. Whether you choose to undergo SMP in Delaware or any other location, the key lies in finding a reputable artist or clinic, planning your desired hairstyle, understanding the procedure, and following the post-care instructions diligently.
So go ahead, show off that artistically pigmented scalp, and let your hair (or lack thereof) down with pride! You’re on your way to rockin’ that head-turning look with confidence and style. Embrace the freedom of a low-maintenance hairstyle, and revel in the compliments that are sure to come your way.
Remember, scalp micropigmentation isn’t just about a cosmetic change—it’s about reclaiming your confidence and feeling great in your own skin. So, take a leap of faith, trust the process, and enjoy the journey of transforming your scalp into a work of art.
Now, get ready to step out into the world with a renewed sense of self-assurance and a head full of confidence. Your new scalp adventure awaits, and you’re more than ready to embrace it with open arms (and a well-moisturized scalp)!
